

4 min
Jul 12, 2024
Indicators
The Bollinger Bands Indicator
The Bollinger Bands Indicator
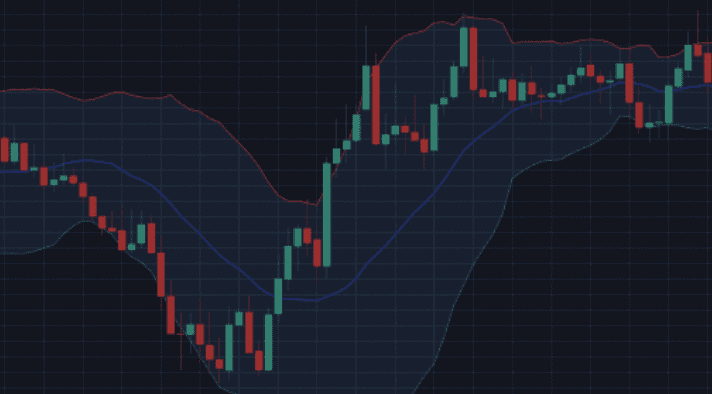
The Bollinger Bands indicator is widely known and a classic in technical analysis. This indicator helps assess if a price is deviating abnormally from its average price, either to the upside or downside. To achieve this, the price of a financial asset is framed within two Bollinger bands that consider the asset’s volatility. Interpretation is straightforward: if the price moves above the upper band, it indicates an overbought condition, while a move below the lower band suggests an oversold condition. Based on the asset's tendency to revert to the mean or the timeframe used, two strategies may emerge. If the asset is assumed to be stationary, a short position might be taken when the price is above the upper band. Conversely, if the asset shows strong momentum, such as during a bull run, a long position might be taken when the price is above the upper band, expecting that the upward movement will continue. The opposite applies to the lower band.


Lucas Inglese
Lucas Inglese
Trading Instructor
The Bollinger Bands Block Configuration
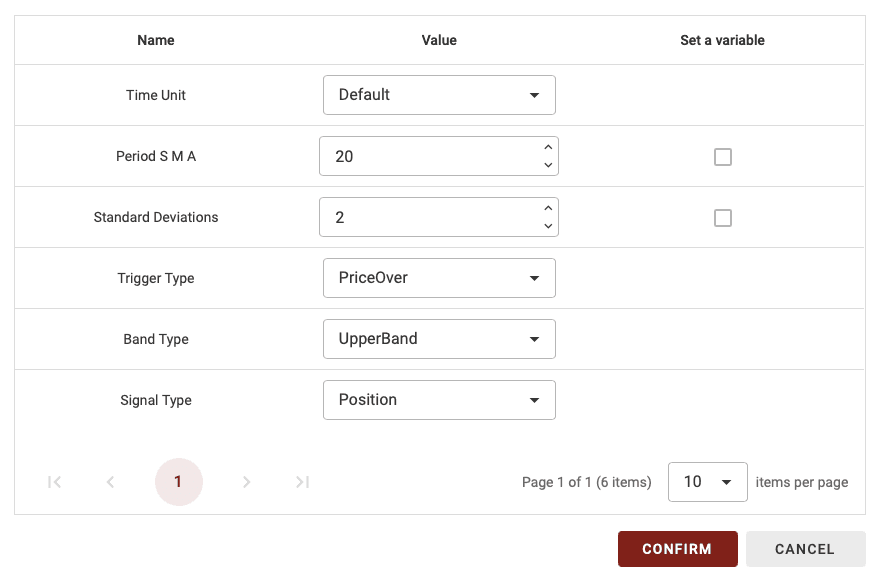
On BullTrading, you have many options to configure each block uniquely. In this block, you can set the time unit, period used, and more.
Time Unit
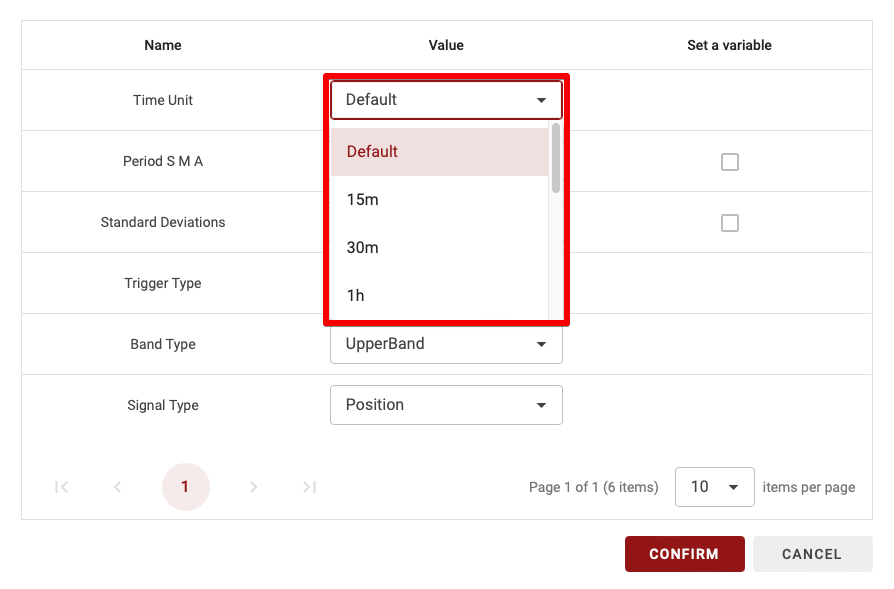
Since BullTrading allows multi-timeframe strategies, you can select the time period for calculating this indicator. You have two options:
Default: If set to Default, the time unit will vary depending on the timeframe used in the backtest.
15m, 30m, 1d, etc.: Choosing a specific time unit means this setting will apply regardless of the time unit used for backtesting your strategy.
TIPS: If you’re a beginner, it’s recommended to leave the time unit on Default.
Period SMA
To create Bollinger Bands, a simple moving average (SMA) is needed, so this is where you choose the period used. The same period is implicitly selected for calculating moving volatility to avoid any issues.
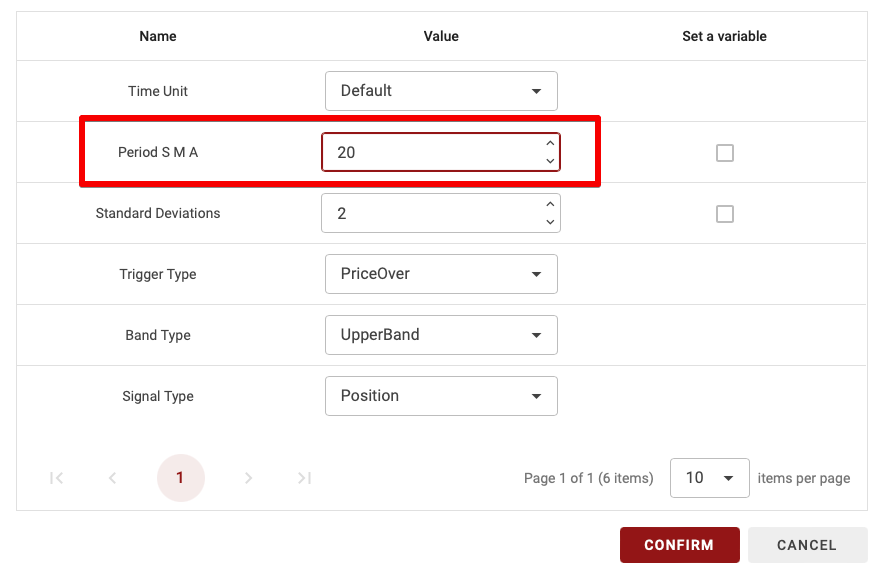
TIPS: Only whole numbers (no decimals) are allowed.
Standard Deviations (Ecart type)
As explained earlier, Bollinger Bands create an area that frames the price. To build it, we subtract N times the moving volatility from the moving average for the lower band and add N times the moving volatility for the upper band.
The higher the standard deviation multiplier, the more challenging it becomes to break out of this area. By default, values of 2 or 3 are often chosen.
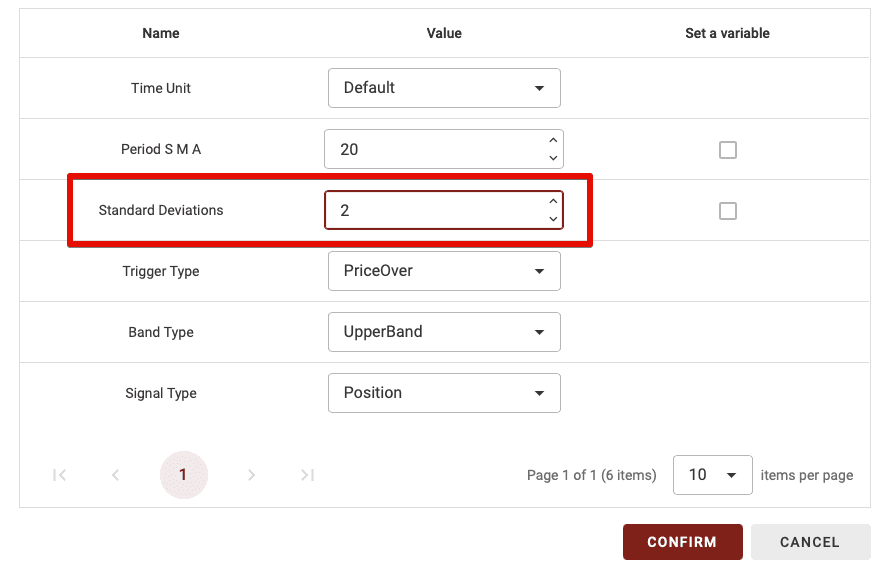
TIPS: Only whole numbers (no decimals) are allowed.
Trigger Type
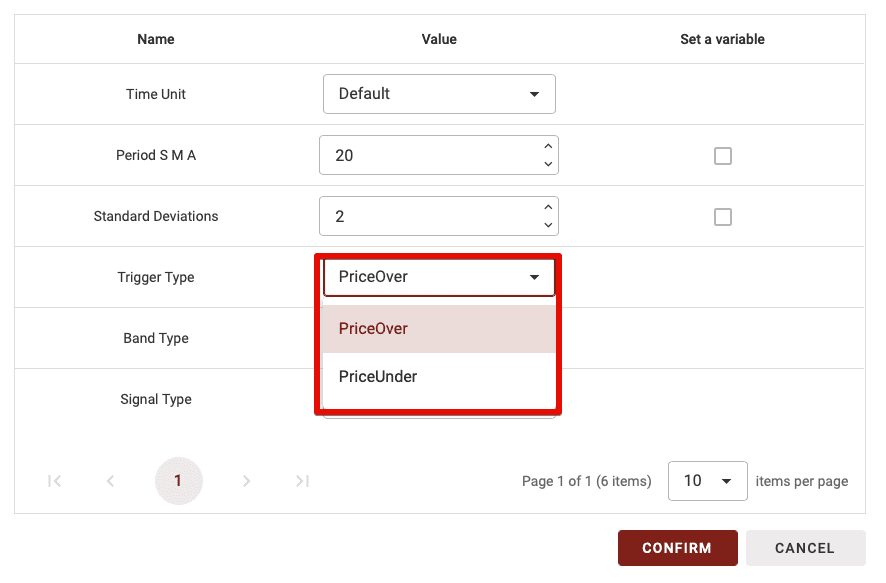
As with other indicators, you need to define when this indicator will be validated. For Bollinger Bands, it’s straightforward, with two options:
PriceOver: when the price is above or moves above the band selected in the next parameter.
PriceUnder: when the price is below or moves below the band chosen in the next parameter.
Band Type
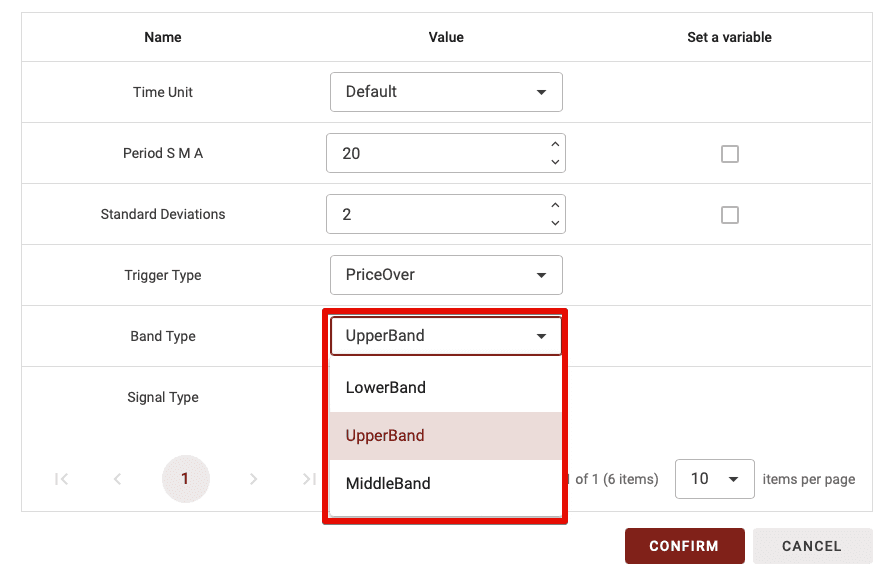
You have three possible bands to set the condition created by this block: the middle band (simply the moving average), the lower band (the lower Bollinger band), and the upper band (the upper Bollinger band).
Signal Type
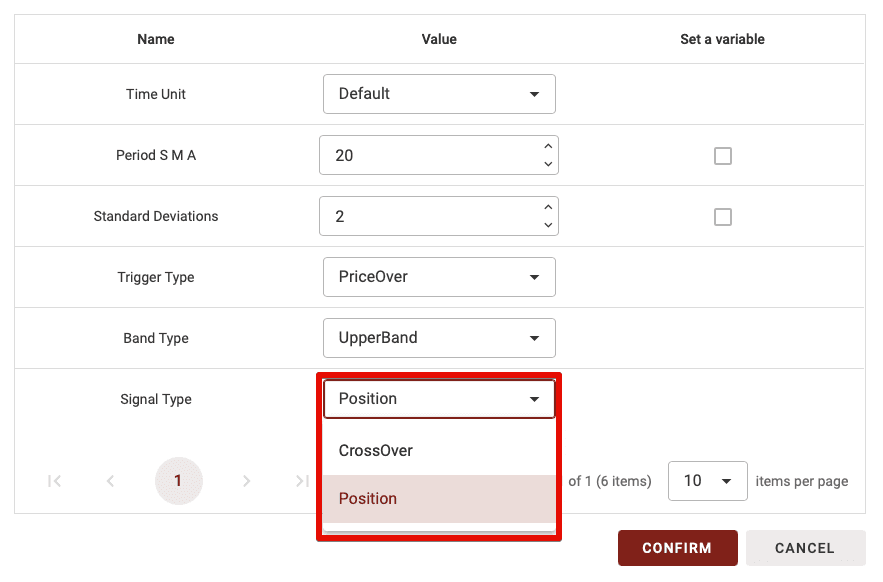
This parameter has two options: CrossOver and Position. Here’s the difference:
CrossOver: If you select CrossOver as the signal type, this block will only validate when the price crosses above or below the selected band.
Position: With this option, the block is validated when the price is above or below the chosen band.
TIPS: The CrossOver parameter is much more restrictive, making it useful when combining only one or two indicators. However, too many blocks set to CrossOver can significantly reduce the number of trades in your strategy, as it requires, for example, a crossover between the two MAs + a crossover with the RSI 70 threshold + a crossover in the Vortex indicator.
So, if you’re a beginner, avoid setting more than one or two blocks to CrossOver when combining multiple indicator blocks.
The Bollinger Bands Block Configuration

On BullTrading, you have many options to configure each block uniquely. In this block, you can set the time unit, period used, and more.
Time Unit

Since BullTrading allows multi-timeframe strategies, you can select the time period for calculating this indicator. You have two options:
Default: If set to Default, the time unit will vary depending on the timeframe used in the backtest.
15m, 30m, 1d, etc.: Choosing a specific time unit means this setting will apply regardless of the time unit used for backtesting your strategy.
TIPS: If you’re a beginner, it’s recommended to leave the time unit on Default.
Period SMA
To create Bollinger Bands, a simple moving average (SMA) is needed, so this is where you choose the period used. The same period is implicitly selected for calculating moving volatility to avoid any issues.

TIPS: Only whole numbers (no decimals) are allowed.
Standard Deviations (Ecart type)
As explained earlier, Bollinger Bands create an area that frames the price. To build it, we subtract N times the moving volatility from the moving average for the lower band and add N times the moving volatility for the upper band.
The higher the standard deviation multiplier, the more challenging it becomes to break out of this area. By default, values of 2 or 3 are often chosen.

TIPS: Only whole numbers (no decimals) are allowed.
Trigger Type
As with other indicators, you need to define when this indicator will be validated. For Bollinger Bands, it’s straightforward, with two options:
PriceOver: when the price is above or moves above the band selected in the next parameter.
PriceUnder: when the price is below or moves below the band chosen in the next parameter.

Band Type
You have three possible bands to set the condition created by this block: the middle band (simply the moving average), the lower band (the lower Bollinger band), and the upper band (the upper Bollinger band).

Signal Type
This parameter has two options: CrossOver and Position. Here’s the difference:
CrossOver: If you select CrossOver as the signal type, this block will only validate when the price crosses above or below the selected band.
Position: With this option, the block is validated when the price is above or below the chosen band.

TIPS: The CrossOver parameter is much more restrictive, making it useful when combining only one or two indicators. However, too many blocks set to CrossOver can significantly reduce the number of trades in your strategy, as it requires, for example, a crossover between the two MAs + a crossover with the RSI 70 threshold + a crossover in the Vortex indicator.
So, if you’re a beginner, avoid setting more than one or two blocks to CrossOver when combining multiple indicator blocks.
The Bollinger Bands Block Configuration

On BullTrading, you have many options to configure each block uniquely. In this block, you can set the time unit, period used, and more.
Time Unit

Since BullTrading allows multi-timeframe strategies, you can select the time period for calculating this indicator. You have two options:
Default: If set to Default, the time unit will vary depending on the timeframe used in the backtest.
15m, 30m, 1d, etc.: Choosing a specific time unit means this setting will apply regardless of the time unit used for backtesting your strategy.
TIPS: If you’re a beginner, it’s recommended to leave the time unit on Default.
Period SMA
To create Bollinger Bands, a simple moving average (SMA) is needed, so this is where you choose the period used. The same period is implicitly selected for calculating moving volatility to avoid any issues.

TIPS: Only whole numbers (no decimals) are allowed.
Standard Deviations (Ecart type)
As explained earlier, Bollinger Bands create an area that frames the price. To build it, we subtract N times the moving volatility from the moving average for the lower band and add N times the moving volatility for the upper band.
The higher the standard deviation multiplier, the more challenging it becomes to break out of this area. By default, values of 2 or 3 are often chosen.

TIPS: Only whole numbers (no decimals) are allowed.
Trigger Type
As with other indicators, you need to define when this indicator will be validated. For Bollinger Bands, it’s straightforward, with two options:
PriceOver: when the price is above or moves above the band selected in the next parameter.
PriceUnder: when the price is below or moves below the band chosen in the next parameter.

Band Type
You have three possible bands to set the condition created by this block: the middle band (simply the moving average), the lower band (the lower Bollinger band), and the upper band (the upper Bollinger band).

Signal Type
This parameter has two options: CrossOver and Position. Here’s the difference:
CrossOver: If you select CrossOver as the signal type, this block will only validate when the price crosses above or below the selected band.
Position: With this option, the block is validated when the price is above or below the chosen band.

TIPS: The CrossOver parameter is much more restrictive, making it useful when combining only one or two indicators. However, too many blocks set to CrossOver can significantly reduce the number of trades in your strategy, as it requires, for example, a crossover between the two MAs + a crossover with the RSI 70 threshold + a crossover in the Vortex indicator.
So, if you’re a beginner, avoid setting more than one or two blocks to CrossOver when combining multiple indicator blocks.


Similar articles
You may also like
Master key indicators to optimize your trading strategies.


Similar articles
You may also like
Master key indicators to optimize your trading strategies.


Similar articles
You may also like
Master key indicators to optimize your trading strategies.
Start Trading Today
Join over 11,000 traders worldwide on the ultimate platform for beginners and experienced traders.
Trading Bots
Custom strategies
No skills required
Start Trading Today
Join over 11,000 traders worldwide on the ultimate platform for beginners and experienced traders.
Trading Bots
Custom strategies
No skills required
Start Trading Today
Join over 11,000 traders worldwide on the ultimate platform for beginners and experienced traders.
Trading Bots
Custom strategies
No skills required
